[Spring] HTTP Header, Rest Client
스프링 복습 및 정리 7P
HTTP Header란?
HTTP 요청 및 응답 메시지의 메타 정보를 포함하는 부분이다.
웹 브라우저와 웹 서버 간의 통신을 제어하고 다양한 정보를 전달하는 데 사용된다.
HTTP헤더는 크게 두 가지로 나눌 수 있다.
요청 헤더 (Request Header)
클라이언트가 웹 서버에게 요청을 보낼 때 전달하는 정보이다.
이 헤더에는 클라이언트의 정보, 요청의 형식, 요청이 어떤 자원을 대상으로 하는지 등의 정보가 포함된다.
GET /index.html HTTP/1.1
Host: www.example.com
User-Agent: Mozilla/5.0 (Windows NT 10.0; Win64; x64)
Accept: text/html,application/xhtml+xml,application/xml;q=0.9,image/webp,image/apng,*/*;q=0.8
응답 헤더 (Response Header)
웹 서버가 클라이언트에게 응답을 보낼 때 포함되는 정보이다.
이 헤더에는 서버의 정보, 응답의 상태, 응답 본문의 형식 등이 포함된다.
HTTP/1.1 200 OK
Content-Type: text/html; charset=UTF-8
Server: Apache/2.4.29 (Ubuntu)
Content-Length: 1234
HTTP 헤더는 다양한 역할을 수행할 수 있으며, 주요 역할은 다음과 같다.
- 인증 및 보안 : 클라이언트 및 서버 간의 인증 및 보안 관련 정보를 포함할 수 있다.
- 캐싱 : 리소스를 캐싱하고 캐시된 리소스를 관리하기 위한 지시사항을 제공한다.
- 콘텐츠 협상 : 클라이언트가 원하는 콘텐츠 형식 및 언어를 지정하는 데 사용된다.
- 세션 관리 : 세션 식별자 및 관리를 위한 정보를 포함할 수 있다.
- 사용자 에이전트 정보 : 클라이언트의 소프트웨어 및 기기 정보를 포함할 수 있다.
HTTP Header의 사용 목적
클라이언트와 서버 관점에서의 HTTP 해더
클라이언트와 서버의 관점에서 내부적으로 가장 많이 사용되는 헤더 정보로 Content-Type이 있다.
클라이언트와 서버는 이 Content-Type이 명시된 데이터 형식에 맞는 데이터들을 주고받는 것이다.
Content-Type 이란?
HTTP 헤더 중 하나로, 전송되는 리소스의 컨텐츠 유형을 명시한다.
이 헤더는 클라이언트에게 전달된 리소스의 형식을 알려주며, 이를 기반으로 클라이언트는 리소스를 어떻게 처리할지 결정한다.
Content-Type이 text/html인 경우, 클라이언트는 해당 리소르를 HTML 문서로 해석한다.
application/json이라면, 클라이언트는 이를 JSON 데이터로 처리한다.
Content-Type: text/html; charset=utf-8
위에서 text/html은 컨텐츠의 주요 유형을 나타내고, charset=utf-8은 해당 리소스의 문자 인코딩 방식을 나타낸다.
개발자들이 직접 실무에서 사용하는 대표적인 HTTP 헤더
클라이언트와 서버 관점에서의 HTTP 헤더들은 개발자가 건드릴 일은 많지 않다.
개발자가 직접 코드 레벨에서 HTTP 헤더를 컨트롤해야 될 경우가 있는데 예를 들어보겠다.
Authorization 더 알아보기
Authorization 헤더 정보는 클라이언트가 적절한 자격 증명을 가지고 있는지를 확인하기 위한 정보이다.
일반적으로 REST API 기반 애플리케이션의 경우 클라이언트와 서버 간의 로그인 인증에 통과한 클라이언트들은 Authorization 헤더 정보를 기준으로 인증에 통과한 클라이언트가 맞는지 확인하는 절차를 거친다.
User-Agent
실무에서 애플리케이션을 구현하다 보면 여러 가지 유형의 클라이언트가 하나의 서버 애플리케이션에 요청을 전송하는 경우가 굉장히 많다.
데스크 탑에서 들어오는 요청과 모바일에서 들어오는 요청을 구분해서 응답 데이터를 다르게 보내줘야 되는 경우가 있을 수 있다.
예를 들면, 모바일 화면과 데스크톱 또는 노트북의 화면 크기의 차이가 많이 나기 때문에 더 큰 화면에서 더 많은 정보를 보여주기 위해 각각 데이터의 종류와 크기가 다를 수 있다.
이 경우, User-Agent 정보를 이용해서 모바일 에이전트에서 들어오는 요청인지 모바일 이외에 다른 에이전트에서 들어오는 요청인지를 구분해서 처리할 수 있다.
HTTP Request Header 정보 얻기
@RequestHeader
개별 헤더 정보 받기
@RestController
@RequestMapping(path = "/v1/coffees")
public class CoffeeController {
    @PostMapping
    public ResponseEntity postCoffee(@RequestHeader("user-agent") String userAgent,
                                     @RequestParam("korName") String korName,
                                     @RequestParam("engName") String engName,
                                     @RequestParam("price") int price) {
        System.out.println("user-agent: " + userAgent);
        return new ResponseEntity<>(new Coffee(korName, engName, price),
                HttpStatus.CREATED);
    }
}
전체 헤더 정보 받기
@RestController
@RequestMapping(path = "/v1/members")
public class MemberController {
    @PostMapping
    public ResponseEntity postMember(@RequestHeader Map<String, String> headers,
                                     @RequestParam("email") String email,
                                     @RequestParam("name") String name,
                                     @RequestParam("phone") String phone) {
        for (Map.Entry<String, String> entry : headers.entrySet()) {
            System.out.println("key: " + entry.getKey() +
                    ", value: " + entry.getValue());
        }

        return new ResponseEntity<>(new Member(email, name, phone),
                HttpStatus.CREATED);
    }
}
PostMember() 요청 결과
key: user-agent, value: PostmanRuntime/7.29.0
key: accept, value: */*
key: cache-control, value: no-cache
key: postman-token, value: 6082ccc2-3195-4726-84ed-6a2009cbae95
key: host, value: localhost:8080
key: accept-encoding, value: gzip, deflate, br
key: connection, value: keep-alive
key: content-type, value: application/x-www-form-urlencoded
key: content-length, value: 54
HttpServletRequest
@RestController
@RequestMapping(path = "/v1/orders")
public class OrderController {
    @PostMapping
    public ResponseEntity postOrder(HttpServletRequest httpServletRequest,
                                    @RequestParam("memberId") long memberId,
                                    @RequestParam("coffeeId") long coffeeId) {
        System.out.println("user-agent: " + httpServletRequest.getHeader("user-agent"));

        return new ResponseEntity<>(new Order(memberId, coffeeId),
                HttpStatus.CREATED);
    }
}
HttpServletRequest 객체를 통해서 Request 헤더 정보를 얻을 수 있다.
HttpServletRequest는 다양한 API를 지원하지만 단순히 특정 헤더 정보에 접근하고자 한다면 앞서 설명한 @RequestHeader를 이용하는 편이 낫다.
HttpEntity
Spring MVC에서는 HttpEntity 객체를 통해서도 헤더 정보를 읽을 수 있다.
HttpEntity는 Request 헤더와 바디 정보를 래핑하고 있으며, 조금 더 쉽게 헤더와 바디에 접근할 수 있는 다양한 API를 지원한다.
@RestController
@RequestMapping(path = "/v1/coffees")
public class CoffeeController{
    @PostMapping
    public ResponseEntity postCoffee(@RequestHeader("user-agent") String userAgent,
                                     @RequestParam("korName") String korName,
                                     @RequestParam("engName") String engName,
                                     @RequestParam("price") int price) {
        System.out.println("user-agent: " + userAgent);
        return new ResponseEntity<>(new Coffee(korName, engName, price),
                HttpStatus.CREATED);
    }

    @GetMapping
    public ResponseEntity getCoffees(HttpEntity httpEntity) {
        for(Map.Entry<String, List<String>> entry : httpEntity.getHeaders().entrySet()){
            System.out.println("key: " + entry.getKey()
                    + ", " + "value: " + entry.getValue());
        }

        System.out.println("host: " + httpEntity.getHeaders().getHost());
        return null;
    }
}
getXXXX() 메서드는 자주 사용되는 헤더 정보만 얻어올 수 있으므로
getXXXX() 메서드로 원하는 헤더 정보를 읽어올 수 없다면
get() 메서드를 사용해서 get(”host”)와 같이 해당 헤더 정보를 얻을 수 있다.
출력 결과
key: user-agent, value: [PostmanRuntime/7.29.0]
key: accept, value: [*/*]
key: cache-control, value: [no-cache]
key: postman-token, value: [368ad61b-b196-4f75-9222-b9a5af750414]
key: host, value: [localhost:8080]
key: accept-encoding, value: [gzip, deflate, br]
key: connection, value: [keep-alive]
host: localhost:8080
HTTP Response Header 정보 추가
ResponseEntity와 HttpHeaders
@RestController
@RequestMapping(path = "/v1/members")
public class MemberController{
    @PostMapping
    public ResponseEntity postMember(@RequestParam("email") String email,
                                     @RequestParam("name") String name,
                                     @RequestParam("phone") String phone) {
        // (1) 위치 정보를 헤더에 추가
        HttpHeaders headers = new HttpHeaders();
        headers.set("Client-Geo-Location", "Korea,Seoul");

        return new ResponseEntity<>(new Member(email, name, phone), headers,
                HttpStatus.CREATED);
    }
}
실행 결과
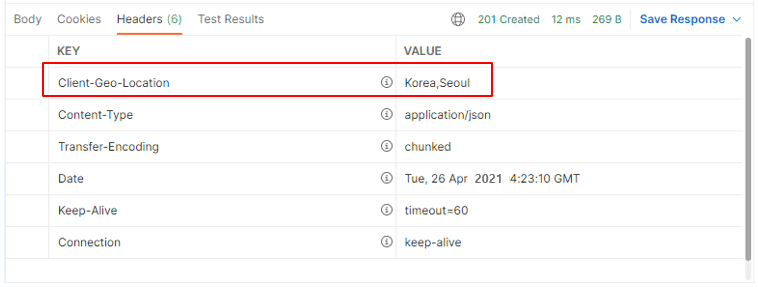
HttpServletResponse
@RestController
@RequestMapping(path = "/v1/members")
public class MemberController{
    @GetMapping
    public ResponseEntity getMembers(HttpServletResponse response) {
        response.addHeader("Client-Geo-Location", "Korea,Seoul");

        return null;
    }
}
HttpServletResponse의 addHeader() 메서드 역시 HttpHeaders의 set() 메서드와 메서드 이름만 다를 뿐 헤더 정보를 추가하는 방법은 같다.
한 가지 차이점은 HttpHeaders 객체는 ResponseEntity에 포함을 시키는 처리가 필요하지만 HttpServletResponse 객체는 헤더 정보만 추가할 뿐 별도의 처리가 필요 없다.
HttpServletRequest와 HttpServletResponse는 저수준(Low Level)의 서블릿 API를 사용할 수 있기 때문에 복잡한 HTTP Request/Response를 처리하는 데 사용할 수 있다.
반면에 ResponseEntity나 HttpHeaders는 Spring에서 지원하는 고수준(High Level) API로써 간단한 HTTP Request/Response 처리를 빠르게 진행할 수 있다.
복잡한 처리가 아니라면 코드의 간결성이나 생산성 면에서 가급적 Spring에서 지원하는 고수준 API를 사용하길 권장한다.
참고 자료
HTTP 헤더(Header) 더 알아보기
HttpServletRequest API Docs 더 알아보기
HttpServletResponse API Docs 더 알아보기
User Agent 더 알아보기
Google Cloud Load Balancing 사례 더 알아보기
AWS Elastic Load Balancing 사례 더 알아보기
Rest Client란?
Rest Client란 말 그대로 Rest API 서버에 HTTP 요청을 보낼 수 있는 클라이언트 툴 또는 라이브러리를 의미한다.
애플리케이션을 만들면서 사용하는 Postman은 UI가 갖춰진 Rest Client라고 보면 된다.
UI가 없는 Backend A의 애플리케이션 내부에서 Backend B의 애플리케이션에 HTTP 요청을 보내려면 Rest Client 라이브러리를 사용하면 된다.
RestTemplate
Java에서 사용할 수 있는 HTTP Client 라이브러리로는 java.net.HttpURLConnection, Apache HttpComponents, OkHttp 3, Netty 등이 있다.
Spring에서는 이 HTTP Client 라이브러리 중 하나를 이용해서 원격지에 있는 다른 Backend 서버에 HTTP 요청을 보낼 수 있는 RestTemplate가 Rest Client API를 제공한다.
RestTemplate를 이용하면 Rest 엔드 포인트 지정, 헤더 설정, 파라미터 및 body 설정을 한 줄의 코드로 순쉽게 전송할 수 있는데 밑에서 단계적으로 설명하겠다.
1. RestTemplate 객체 생성
public class RestClientExample01 {
    public static void main(String[] args) {
        // (1) 객체 생성
        RestTemplate restTemplate =
                new RestTemplate(new HttpComponentsClientHttpRequestFactory());
    }
}
HttpComponentsClientHttpRequestFactory 클래스를 통해 Apache HttpComponents를 전달한다.
Apache HttpComponents를 사용하기 위해서는 builde.gradle에 의존 라이브러리를 추가한다.
dependencies {
    implementation 'org.apache.httpcomponents:httpclient'
}
2. URI 생성
RestTemplate 객체를 생성했다면 HTTP Request를 전송할 Rest 엔드포인트의 URI를 지정해 주어야 한다.
(테스트를 위해서 HTTP Request 엔드 포인트로 World Time API의 URI를 사용하고 있다.) 바로가기
import org.springframework.http.client.HttpComponentsClientHttpRequestFactory;
import org.springframework.web.client.RestTemplate;
import org.springframework.web.util.UriComponents;
import org.springframework.web.util.UriComponentsBuilder;
import java.net.URI;

public class RestClientExample01 {
    public static void main(String[] args) {
        // (1) 객체 생성
        RestTemplate restTemplate =
                new RestTemplate(new HttpComponentsClientHttpRequestFactory());

        // (2) URI 생성
        UriComponents uriComponents =
                UriComponentsBuilder
                        .newInstance()
                        .scheme("http")
                        .host("worldtimeapi.org")
//                        .port(80)
                        .path("/api/timezone/{continents}/{city}")
                        .encode()
                        .build();
        URI uri = uriComponents.expand("Asia", "Seoul").toUri();
    }
}
newInstance()UriComponentsBuilder객체를 생성한다.
scheme()- URI의 scheme을 설정한다.
host()- 호스트 정보를 입력한다.
port()- 디폴트 값은 80이므로 80포트를 사용하는 호스트라면 생략 가능하다.
path()- URI의 경로를 입력한다.
- 위 예제에서는 {continents}, {city}의 두 개의 템플릿 변수를 사용하고 있다.
- 두 개의 템플릿 변수는
uriComponents.expand("Asia", "Seoul").toUri();에서expand()메서드 파라미터의 문자열로 채워진다. ({Asia}/{Seoul})
encode()- URI에 사용된 템플릿 변수들을 인코딩해준다.
- 이 인코딩의 의미는 non-ASCII 문자와 URI에 적절하지 않은 문자를 Percent Encoding 한다는 의미이다.
build()UriComponents객체를 생성한다.
expand()- 파라미터로 입력한 값을 URI 템플릿 변수의 값으로 대체한다.
toUri()URI객체를 생성한다.
3. 요청 전송
getForObject()를 이용한 문자열 응답 데이터 전달받기
public class RestClientExample01 {
    public static void main(String[] args) {
        // (1) 객체 생성
        RestTemplate restTemplate =
                new RestTemplate(new HttpComponentsClientHttpRequestFactory());

        // (2) URI 생성
        UriComponents uriComponents =
                UriComponentsBuilder
                        .newInstance()
                        .scheme("http")
                        .host("worldtimeapi.org")
                        // .port(80)
                        .path("/api/timezone/{continents}/{city}")
                        .encode()
                        .build();
        URI uri = uriComponents.expand("Asia", "Seoul").toUri();

        // (3) Request 전송
        String result = restTemplate.getForObject(uri, String.class);

        System.out.println(result);
    }
}
getForObject(URI uri, Class<T> responseType)getForObject()메서드는 HTTP Get 요청을 통해 서버의 리소스를 조회한다.URI uri: Request를 전송할 엔드포인트의 URI 객체를 지정해 준다.Class<T> responseType: 응답으로 전달받을 클래스의 타입을 지정해 준다.
실행 결과
abbreviation: KST
client_ip: 125.129.191.130
datetime: 2022-04-28T09:49:44.492621+09:00
day_of_week: 4
day_of_year: 118
dst: false
dst_from:
dst_offset: 0
dst_until:
raw_offset: 32400
timezone: Asia/Seoul
unixtime: 1651106984
utc_datetime: 2022-04-28T00:49:44.492621+00:00
utc_offset: +09:00
week_number: 17
커스텀 클래스 타입으로 원하는 정보만 응답으로 전달받기
public class RestClientExample02 {
    public static void main(String[] args) {
        // (1) 객체 생성
        RestTemplate restTemplate =
                new RestTemplate(new HttpComponentsClientHttpRequestFactory());

        // (2) URI 생성
        UriComponents uriComponents =
                UriComponentsBuilder
                        .newInstance()
                        .scheme("http")
                        .host("worldtimeapi.org")
                        // .port(80)
                        .path("/api/timezone/{continents}/{city}")
                        .encode()
                        .build();
        URI uri = uriComponents.expand("Asia", "Seoul").toUri();

        // (3) Request 전송. WorldTime 클래스로 응답 데이터를 전달받는다.
        WorldTime worldTime = restTemplate.getForObject(uri, WorldTime.class);

        System.out.println("# datatime: " + worldTime.getDatetime());
        System.out.println("# timezone: " + worldTime.getTimezone());
        System.out.println("# day_of_week: " + worldTime.getDay_of_week());
    }
}
WorldTime 클래스
public class WorldTime {
    private String datetime;
    private String timezone;
    private int day_of_week;

    public String getDatetime() {
        return datetime;
    }

    public String getTimezone() {
        return timezone;
    }

    public int getDay_of_week() {
        return day_of_week;
    }
}
WorldTime 클래스를 사용해서 전체 응답 데이터를 모두 전달받는 것이 아니라 datetime 과 timezone 정보만 전달을 받고 있다.
전달받고자 하는 응답 데이터의 JSON 프로퍼티 이름과 클래스의 멤버변수 이름이 동일해야 하고
해당 멤버 변수에 접근하기 위한 getter 메서드 역시 동일한 이름이어야 한다.
예를 들어, JSON 프로퍼티 이름이 day_of_week라면 클래스 멤버 변수의 이름도 day_of_week여야 하고,
클래스 멤버 변수의 getter 메서드 명은 getDay_of_week가 되어야 한다.
실행 결과
# datatime: 2021-10-10T11:39:15.099207+09:00
# timezone: Asia/Seoul
# day_of_week: 4
getForEntity()를 사용한 정보 전달받기
getForentity()를 사용한 Response Body + Header 정보 전달받기
public class RestClientExample02 {
    public static void main(String[] args) {
        // (1) 객체 생성
        RestTemplate restTemplate =
                new RestTemplate(new HttpComponentsClientHttpRequestFactory());

        // (2) URI 생성
        UriComponents uriComponents =
                UriComponentsBuilder
                        .newInstance()
                        .scheme("http")
                        .host("worldtimeapi.org")
//                        .port(80)
                        .path("/api/timezone/{continents}/{city}")
                        .encode()
                        .build();
        URI uri = uriComponents.expand("Asia", "Seoul").toUri();

        // (3) Request 전송. ResponseEntity로 헤더와 바디 정보를 모두 전달받을 수 있다.
        ResponseEntity<WorldTime> response =
                restTemplate.getForEntity(uri, WorldTime.class);

        System.out.println("# datatime: " + response.getBody().getDatetime());
        System.out.println("# timezone: " + response.getBody().getTimezone()());
        System.out.println("# day_of_week: " + response.getBody().getDay_of_week());
        System.out.println("# HTTP Status Code: " + response.getStatusCode());
        System.out.println("# HTTP Status Value: " + response.getStatusCodeValue());
        System.out.println("# Content Type: " + response.getHeaders().getContentType());
        System.out.println(response.getHeaders().entrySet());
    }
}
응답으로 전달되는 모든 헤더 정보를 보고 싶다면 getHeaders().entrySet() 메서드를 이용해서 확인할 수 있다.
exchange()를 사용한 응답 데이터 받기
exchange() 메서드를 사용한 방식은 앞에서 보았던 방식들보다 조금 더 일반적인 HTTP Request 방식이다.
HTTP Method나 HTTP Request, HTTP Response 방식을 개발자가 직접 지정해서 유연하게 사용할 수 있다.
exchange(URI uri, HttpMethod method, HttpEntity<?> requestEntity, Class<T> responseType)
public class RestClientExample03 {
    public static void main(String[] args) {
        // (1) 객체 생성
        RestTemplate restTemplate =
                new RestTemplate(new HttpComponentsClientHttpRequestFactory());

        // (2) URI 생성
        UriComponents uriComponents =
                UriComponentsBuilder
                        .newInstance()
                        .scheme("http")
                        .host("worldtimeapi.org")
                        // .port(80)
                        .path("/api/timezone/{continents}/{city}")
                        .encode()
                        .build();
        URI uri = uriComponents.expand("Asia", "Seoul").toUri();

        // (3) Request 전송. exchange()를 사용한 일반화 된 방식
        ResponseEntity<WorldTime> response =
                restTemplate.exchange(uri,
                        HttpMethod.GET,
                        null,
                        WorldTime.class);

        System.out.println("# datatime: " + response.getBody().getDatetime());
        System.out.println("# timezone: " + response.getBody().getTimezone());
        System.out.println("# day_of_week: " + response.getBody().getDay_of_week());
        System.out.println("# HTTP Status Code: " + response.getStatusCode());
        System.out.println("# HTTP Status Value: " + response.getStatusCodeValue());
    }
}
RestTemplate 적용
결제 서비스
결제 서비스를 지원해 주는 PG(Payment Gateway)사와의 API 통신에 REstTemplate을 사용할 수 있다.
메시징 기능
카카오톡 같은 메시지로 고객에게 메시지 알람을 전송할 필요가 있을 때,
외부의 메시징 서비스와의 HTTP 통신을 위해서 RestTemplate을 사용할 수 있다.
외부 웹 서비스와의 통합
다른 웹 서비스의 API를 호출하여 데이터를 가져오거나 외부 서비스로 데이터를 전송하는 데 사용된다.
예를 들어, 지도 서비스 API를 사용하여 위치 정보를 검색하거나, 소셜 미디어 플랫폼과 상호 작용할 때 사용할 수 있다.
인증 및 보안
HTTP기반의 보안 프로토콜을 사용하여 인증된 웹 서비스와 통신하는 데 활용될 수 있다.
OAuth또는 기타 인증 토큰을 사용하여 웹 서비스에 안전하게 액세스할 수 있다.
웹 스크래핑
웹 사이트에서 데이터를 추출하는 데 사용할 수 있다.
웹 스크래핑은 주어진 URL로 HTTP 요청을 보내고 HTML 응답을 파싱하여 원하는 데이터를 추출하는 프로세스이다.
마이크로서비스 아키텍처
마이크로서비스 아키텍처에서 서로 다른 마이크로서비스 간에 통신하는 데 사용될 수 있다.
각 마이크로서비스는 RESTful 엔드포인트를 노출하고, RestTemplate을 사용하여 다른 서비스와 상호 작용 한다.
테스트
RestTemplate은 테스트 코드에서도 자주 사용된다.
모의 객체(mock)를 사용하여 통합 테스트를 수행하거나, 외부 서비스 대신 테스트용 스텁(stub) 서버와 통신하는 데 활용 될 수 있다.
데이터 수집 및 분석
웹 사이트에서 대량의 데이터를 수집하고 분석하는 데 사용될 수 있다.
예를 들어, 뉴스 기사, 주식 가격, 날씨 데이터 등을 수집하고 분석하는 데 활용할 수 있다.
외부 시스템과의 통합
외부 시스템 또는 서비스와의 통합에 사용될 수 있다.
예를 들어, ERP 시스템, CRM 시스템, 결제 게이트웨이 등과의 통합에 활용될 수 있다.
클라우드 서비스와 통합
클라우드 서비스 (AWS, Azure, Google Cloud 등)의 API를 호출하여 클라우드 리소스를 관리하거나 클라우드 서비스와 상호 작용하는 데 사용될 수 있다.
Spring 공식 API 문서에는 RestTemplate이 5.0 버전부터 maintenance mode 상태를 유지한다라고 명시되어 있다.
maintenance mode란 API의 사소한 변경이나 버그에 대해서는 대응을 하겠지만 신규 기능의 추가는 없을 것이라는 의미이다.
미래에는 Deprecated될 가능성이 있다고도 볼 수 있다.
하지만 학습하기 위해 가장 적절한 Rest Client는 여전히 RestTemplate이다.
Spring 공식 문서에는 RestTemplate 대신에 WebClient라는 현대적인 API를 사용하라고 권장을 한다.
WebClient는 원래 Non-Blocking 통신을 주목적으로 탄생한 Rest Client이다.
물론 Blocking 통신을 지원하기 때문에 RestTemplate 대신에 WebClient의 사용을 고려해 보라고 권장하는 건 맞지만
WebClient를 제대로 잘 사용하기 위해서는 Non-Blocking의 개념과 Spring WebFlux의 개념을 이해하고 난 다음에 사용하는 것이 낫다.
참고 자료
RestTemplate API 더보기
RestTemplate API Docs 더보기
Spring Boot 핵심 정리 모음
1P - POJO, IoC, DI, AOP, PSA >
3P - 컴포넌트 스캔과 의존성 자동 주입, @Autowired >
5P - Spring MVC / MVC의 동작 방식과 구성 요소 >
7P - HTTP Header, Rest Client >
9P - Service / Entity 클래스, Mapper / MapStruct >
10P - 예외 처리 (@ExceptionHandler, @RestControllerAdvice) >
11.1P - DDD, 도메인 엔티티 및 테이블 설계 >
11.2P - 데이터 액세스 계층 구현 (도메인 엔티티 클래스 정의) >
11.3P - 데이터 액세스 계층 구현 (서비스, 리포지토리 구현) >
12P - JPA(Java Persistence API) >
12.3P - Spring Data JPA 데이터 액세스 계층 구현 >
14P - Spring MVC Testing 단위 테스트 >
14.3P - 슬라이스 테스트 (API, 데이터 액세스 계층) >
14.5P - TDD (Test Driven Development) >
15P - API 문서화 (Documentation) >
댓글남기기